The Corner You Never Wash: A Coastal Fuel-Filler Corrosion Check
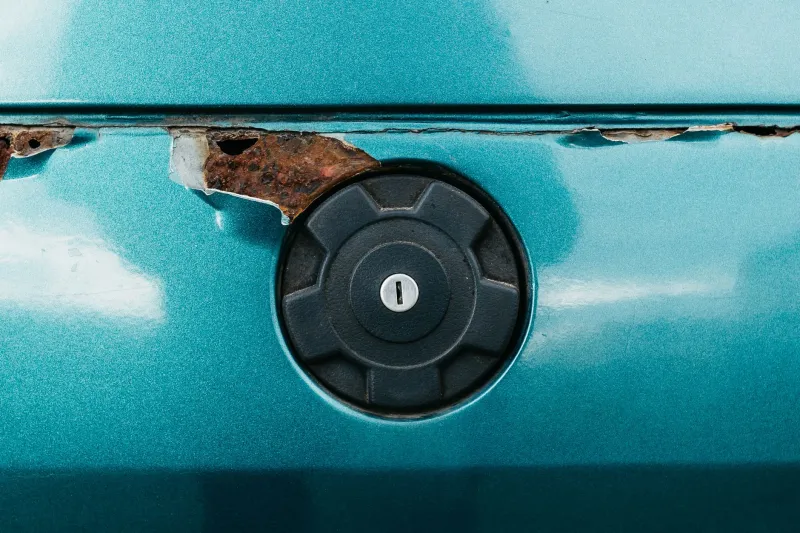
On a dry summer day, the little recess behind your fuel flap looks about as interesting as a tax form. On a Blackpool morning in November, after an onshore wind has hurled salty spray down the Prom and the gritters have done their rounds, it starts to look a lot more interesting. That closed flap hides a shallow tray of painted metal, rubber seals, a filler neck and — on most cars — a tiny drain hole. It is also one of the few places on a coastal car that rarely sees a wash mitt.
Why the filler recess deserves a second look
Most of us wash the outside of the flap because it is visible. We forget the inside because it spends its life shut. But water and road grime do not need an invitation. Spray creeps in around the flap, grit settles in the bottom of the recess, and any rainwater that lands there is supposed to escape through the drain hole. When that hole silts up, the recess turns into a shallow puddle that sits against the paint and the filler neck.
Add salt to that mix and you have a classic corrosion recipe. It is rarely dramatic at first: a faint orange stain near a seam, a bubble under the paint, a tired-looking cap seal. Leave it through a Fylde coast winter and a small nuisance can become a bodyshop job. The good news is that the check takes about five minutes and fits neatly into a normal fill-up.
What you need — and what to leave in the shed
You do not need a detailing trolley for this one. A phone torch, a microfibre cloth, a soft detailing brush, a small jug of water, a pipe cleaner or soft plastic zip tie, and a spray wax or sealant will do it. A little silicone grease is useful if your handbook allows it for the cap seal.
Leave the screwdriver, wire coat hanger and pressure washer out of it. The drain hole is usually connected to a thin tube, and aggressive poking can dislodge or pierce it. A soft tool and a gentle flush are safer. Also, avoid spraying sealant or cleaner directly into the fuel filler opening. This is a paint-and-drain check, not an engine bay blitz.
The five-minute fill-up routine
1. Open the flap and look properly. Use your phone torch and check the painted edges, the bottom of the recess and the area around the filler neck. You are looking for standing water, grit, brown tide marks, paint bubbles or orange staining along seams. Take a quick before photo if you are unsure what is normal. Close-up shots are surprisingly good at showing a problem you would miss at arm's length.
2. Inspect the cap and its rubber seal. Remove the cap and look at the rubber ring. It should be flexible and clean, not cracked, flattened or coated in grit. Wipe it with a damp microfibre and dry it. A hardened seal can let moisture past, and a gritty one can wear the sealing surface. If the rubber is perished, replace the cap or seal rather than coating it in something hopeful.
3. Test the drain hole. Pour a small amount of clean water into the bottom of the recess and watch where it goes. If it disappears, good. If it pools, the drain is blocked. Clear it gently with a soft pipe cleaner or the tip of a plastic zip tie, then flush again. Do not force debris further down the tube. If water still sits there after a couple of gentle attempts, get it looked at — a disconnected or crushed drain tube is not a DIY mystery worth solving with a screwdriver.
4. Wipe the filler neck and surround. Use a damp microfibre and a soft brush to lift dust and grit from the recess, working away from the open filler neck. Keep dirt out of the tank. Dry the area properly before you add any protection. If you can see rust staining on the neck itself, note it and book a proper inspection rather than polishing over it.
5. Protect the paint and close up. A light mist of spray wax or paint sealant on the painted surfaces inside the recess will help water bead and run off. Avoid the filler opening and the rubber seal. Buff it clear with a clean microfibre, check the flap closes flush, and carry on with your fill-up.
The before-and-after you want to see
A useful before shot shows the dull grey film, the grit ring around the cap and the brown waterline at the bottom of the recess. The after shot — same angle, same light — should show clean paint, a clear drain hole and water beading rather than pooling. It is not a glamorous transformation, but it is a satisfying one. More importantly, it is the kind of small catch that stops a coastal car from quietly corroding behind a closed door.
Make it a winter habit
Through the colder months, repeat the check every few fill-ups, especially after a run along the seafront or a week of wet, gritty commutes. It takes less time than queueing for a coffee at a services. If you spot heavy bubbling, flaking metal, a strong fuel smell or a cap that will not seal, stop treating it as a cleaning job and get it inspected properly. The fuel flap may be the corner you never wash, but it is worth five minutes of attention before the salt gets comfortable.